Good morning!


I have no idea how you stumbled upon this blog, but welcome. I will try to not waste your time, but I offer no guarantees. My name is Mike Donaldson, and I am a woodworker. There, I said it.


My Dad was a real woodworker, and he actually knew what he was doing, so much so that when he passed away in 2011, he still had all of his fingers. After he passed away, I purchased most of his tools from my mother and started working wood


I really don't like power tools. First off, power tools scare the poop out of me. I am pretty sure my table saw is trying to kill me; it has eaten a few of my projects and thrown some wood at me, hitting me a few times. My planer has done that, too. I'm pretty sure it's a conspiracy.


Secondly, I love the calm and the quiet of working by hand; using all of your senses (except taste, wood looks and smells good, but doesn't taste so great).


So there you have it. I now (almost) use hand tools exclusively, and really enjoy it. As you read on I will show you some of my projects, and some of how I did it. So sit back, take your shoes off, put your pants back on, and enjoy the blog.

Sunday, June 10, 2012

Helping my Daughter Make the Bed.

Ever since I started woodworking (a whole year now!), my 9-year-old daughter, Emry, has been asking me to teach her how to work wood.  I started by telling her that as soon as I figured out what I was doing, I would teach her (I have since realized that one never really does figure out what they are doing), but most recently I said that if she came up with a project, I would help her with it.  

A few weeks ago, she came up with a project:  She wanted to build a bed for her doll.  I was in the middle of the purple box project, but we made time, and started the bed.  We went to Woodcraft in Virginia Beach and poked through the scrap bin, I found some decent sized boards for a few dollars, and since she planned on painting it, it didn't really matter what the wood looked like.  

Emry and I then got out a piece of paper, and drew up a basic plan of what the bed would look like.  My rule was that she had to do the lions share of the work, so I ripped the board into bed parts, and Emry would cut all the joinery.  

After laying out the pieces and getting our heads around it, I had Emry use the marking gauge to layout all the joinery.  The head board and foot board were joined using half laps, so she started cutting those:  


I let her use my Japanese dovetail saw, as well as the western dovetail saw.  She preferred the Japanese saw because the handle was easier for her to hold, and she got really good at following the layout lines, and cutting some tight joints.  After the cutting, she removed the waste with a chisel:  


Then we glued up the head board and foot board, clamped them and called it a night.  


After the headboard and footboard were dry, she cut the mortice and tenon joints for the side rails.  She had a little harder time with the layout, but after we colored in the waste, her cuts were spot on.  


Now, for the mortices:  These were fun cause she got to hit things with a mallet.  She actually has really good forum, and did a great job on them.  Cutting the mortices did highlight my need for a legitimate workbench, and a better vise.  All in good time....


After the mortices were cut, and everything was dry-fitted, we glued it up and let it sit overnight again.  


The next day, we filled in the little gaps with wood filler, then sanded the whole thing down and got it ready for paint.  


For the paint, we went to Lowes and checked out the 'oops rack' where the erroneously mixed paint is sold for cheap.  We found a gallon of Valspar primer paint combo in bubble gum pink for $5.  Its hard to beat that.  Grab a few foam brushes and we were off the the races.  


In the end, Emry and I had a great time working on a project together, she learned a lot, and so did I.  I have always learned the most by teaching others, and this was a great opportunity for me.  The other benefit is that Emry has a really good quality doll bed that cost less than $10 to make.  How cool is that?!


Monday, June 4, 2012

It's Been a Year. Mom, This is for You.

Today is June 4th.  It is exactly one year ago that my Dad passed away.  I wanted to make something for my mom for the anniversary so I started working on a box design a few months ago (Hey!  I didn't procrastinate this time!).  My Mom's favorite color is purple, so, naturally I made the box out of Purpleheart.  In case you haven't noticed, I like Purpleheart.  


I based the design of the box on Hebrew architecture, and decided to try some new things.  First off, this is my first completely successful veneering project, and it is my first time using mother of pearl inlay.  The veneering was great, but the mother of pearl was a bear (ironically, my Mom loves bears, too).  
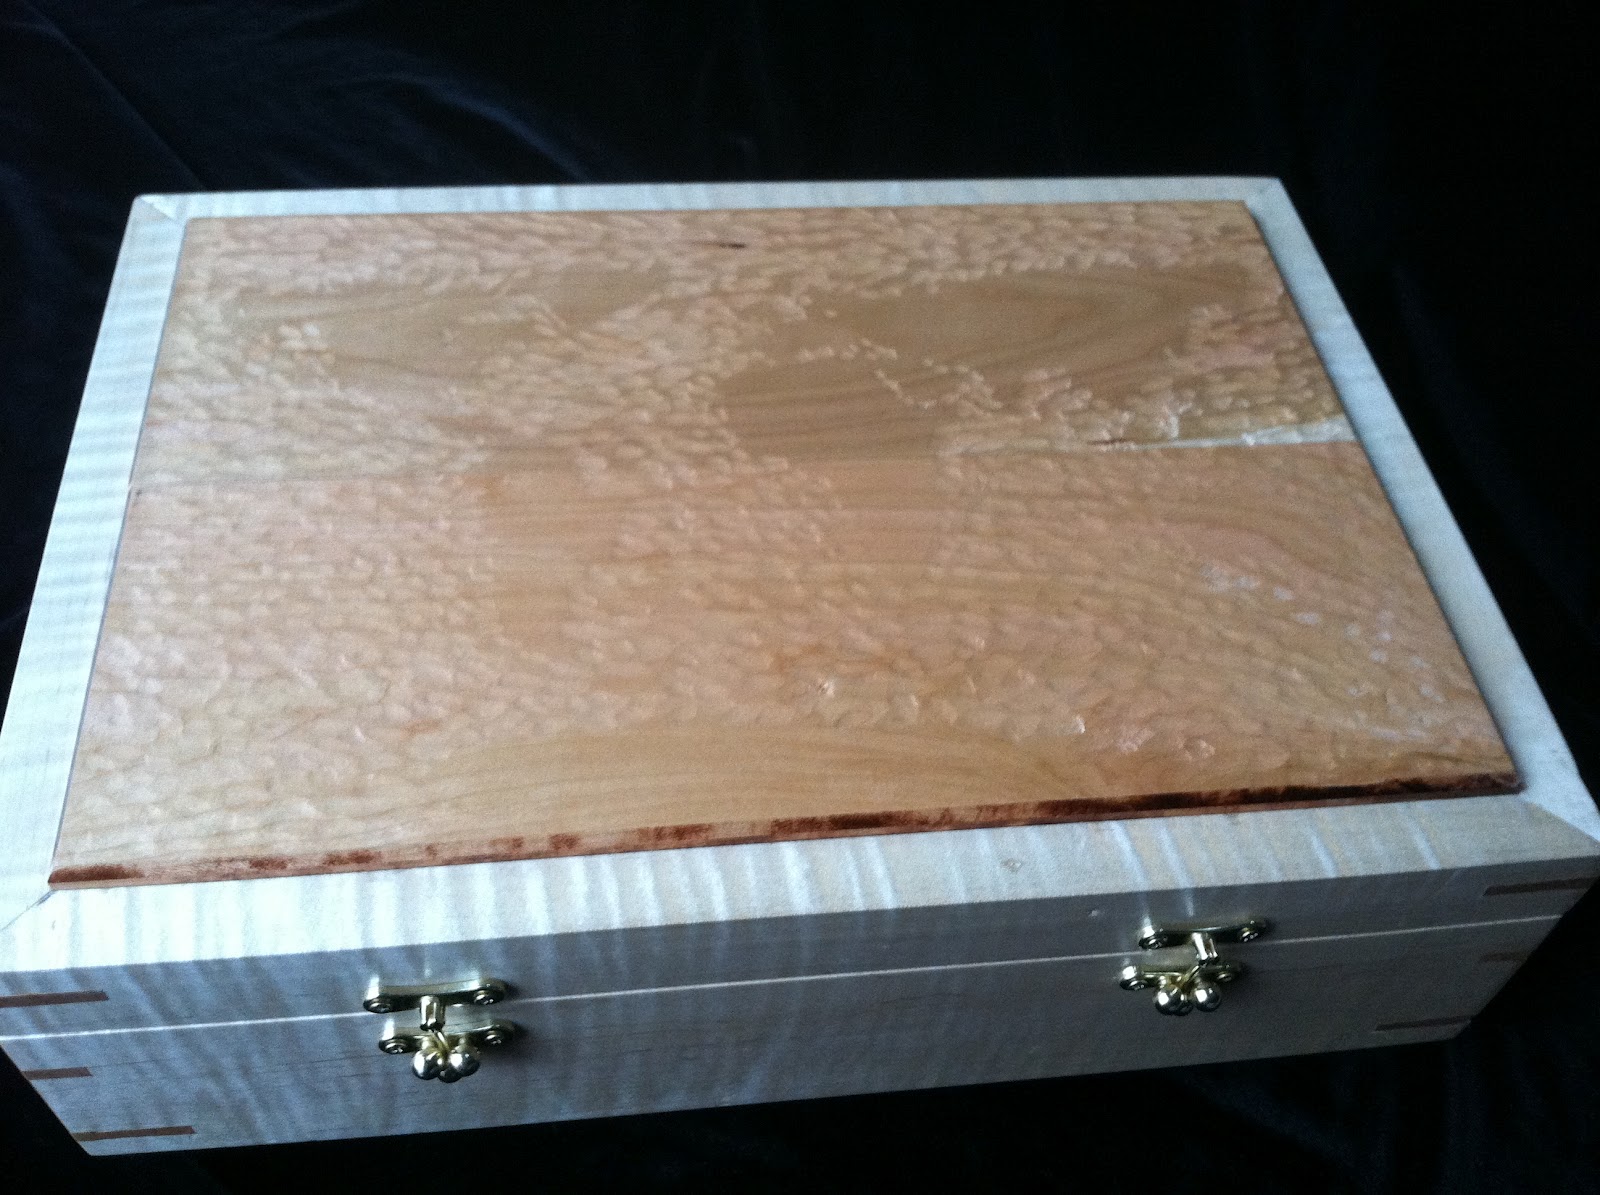
So here is the box, The lighter wood is Curly Maple.  The way I used it makes the fact that it is curly irrelevant, but its what I had.  Lets talk construction, and the issues associated therein...The mitered corners were horrible.  all but one of the corners had significant gaps in them and it was really frustrating. I have not made my shooting board yet, so the only way I can cut the miters is on the man-eating death machine (some people call this a table saw).  Unfortunately, the blade on the saw only tilts to 44 degrees, so the miters are terrible.  I really wanted this box to turn out well, so I had a stroke of brilliance (or stupidity, I haven't decided yet) and I used my dovetail saw to OPEN the gaps in the miters, and then I glued in a piece of Purpleheart veneer that just happens to be the exact thickness of the dovetail saw's kerf and Presto!  perfect-ish miters! 
For the top, I just veneered a piece of Purpleheart to a piece of Maple, cut it to fit the top of the box, then used my block plane to angle the sides in, revealing the Maple.  Next I cut the slots for the splines using my old nemesis, the table saw.  I think I am going to start cutting these by hand.  The handles on the front and sides were just scrap pieces that I thought looked cool, so I glued them on.  They added a little texture and color, made it a bit more interesting.  With all that done, it was time to do the inlay. evil evil inlay.  

So it seemed pretty straight forward.  I cut the Hebrew characters (which say Remember) out of the mother of pearl, trace them onto the top, and then cut an equal sized slot.  Reality was a little different story.  The mother of pearl sheet was 0.006" thick and as brittle as a politician's ego.  The first letter I cut was in three pieces before I finally got it free from the sheet.  I modified my technique and just lightly scored the sheet with an exacto knife over and over and over and over until the other letters came free.  Then I traced them onto the wood and broke out the carving chisels.  Cutting the slots for the letters was also tricky, especially when I had to cut cross-grain, and there are several spots where the whole is bigger than the mother of pearl, but you live you learn.  I then carefully glued the letters in and it looked pretty good for my first time.  
Then I tried to sand the top of the box to prepare it for finishing.  I oh so lightly went over the top with a 320 grit sanding block when I looked down and realized that the bottom half of two of the letters had been ripped out.  I just stood there, mouth agape, for a few years (others may have counted the time in seconds).  I spend an undisclosed amount of time searching the floor of my workshop until I finally found both pieces and glued them back down.  I am pretty sure the box was telling me that the top wasn't supposed to be as shiny as the rest of it.  No sanding for you!

The inside of the lid includes a little pyrography.  My Dad was an engineer, and also going with the Hebrew theme, I used two interlocking rings; the Hebrew symbol for eternity, and the mathematical symbol for 'we can't count that high'.  Then I added my parents initials to each ring.  
Mortices for the hinges were hand cut and fitted, the edges of the box were relaxed slightly with my block plane, then I started finishing.  I have been experimenting with wipe-on Polyurethane, and got good results on my scrap wood (my Dad always said to use the three 'F's:  Finish Firewood First), so I started into it.  By this point in a project, I am usually in a hurry to be done, so I rush, and thereby screw up the finish.  The wipe-on poly requires 4 hours between coats, so I was forced to slow down and do it right.  I put 8 coats on and was happy with the results.  The final coat was a Spar Urethane, which includes a UV blocker that I hope will help prevent the Purpleheart from browning over time.  We'll see if it works in a few years.  

The last step was to apply the felt lining.  This involves laying down a tar-like glue then spreading felt fibers onto it.  After 15 hours of drying time, simply vacuum off the excess fibers, and the lining is done.  

 I enlisted the help of my 3-year-old, Tave, to help me wrap it up and ship it.  We used an old Woodcraft catalog for padding in the box.  I ripped out pages and Tave crinkled them up and put them in the box.  My Mom really liked it.  Now, I need to re-sharpen all my hand planes.  Purpleheart has a really high silica content, so it dulls things really quick.  I think I will take some pictures so I can do a blog post on adventures in sharpening.  It would be cool if people actually read this blog.  

Sunday, June 3, 2012

Some Boxes Come at a Great Risk

So a good friend of mine at work asked me to make him a box.  His brother's birthday was coming up, and they were both avid Risk players.  For his brother's birthday present, he had gotten him a Metal Gear Solid (which I guess is a video game or show or something) limited edition Risk game.  He wanted me to make him a presentation case for the game.  A box in which to put a box, in which is a board game.  He wanted it to be made of Curly Maple, and he wanted mitered corners, other than that, I was free to do as I pleased.


I agonized over the top of the box.  I knew it needed to be a contrast to the Maple, and that it couldn't have much figure because the Maple I used was AMAZING.  I decided to use Cherry.  I cut the pieces and placed them into the top, and realized that I had measured the grain wrong, and it looked like poop.  And I didn't have any extra Cherry to start over.  What to do....I then had an idea, so I got on the computer and printed out a world map.  I then drew the world on the top of the box freehand, and used a gouge to texture everything on the top that wasn't land.  The result was a textured top that hid the poopy grain selection, and offered a subtle tie-in to the game's premise of global domination.
I think it turned out pretty cool.  I plan to use that technique again for future projects.  For the inside, I used the same gouge to make some recesses to put your fingers in to remove the game from the box, and then felt-lined the inside.  He was happy with it.  


It was difficult, but I managed to get the mitered corners just about perfect, but not quite.  It did highlight my need for a shooting board, and I have plans to build one, as will be chronicled in a future post.....


An Anchor for a Chief.

I was recently able to dupe some of the people I work with into actually PAYING me to make a retirement gift for one of our Chief's who was retiring.  They wanted me to make a plaque, and other than that, I was free to do whatever I wanted.  Well, holding true to form, I waited until the last possible minute to start making it.  The real reason I started when I did was because another one of the Chief's asked me how it was coming, and I responded that I was almost done figuring out what I was going to make.  This was 10 days before the retirement ceremony.  He looked worried.  


Sooooo, I went to Woodcraft in Virginia Beach (one of my favorite places), bought some Cherry, and some Curly Maple, and a little Purpleheart, and started the process of figuring out what the dump I was going to do.  I decided that making a chief's anchor for the plaque would be ideal, so I went with that.  Here is what a Coast Guard Chief's anchor looks like:  

Easy enough.....except that the chain looks kinda important.  I made the main shield out of Cherry, with a Purpleheart strip in the middle, and the anchor out of Curly Maple.  I used a woodburner to add the Chief's name, and our department name, inlayed a few unit coins and a department patch, and life was good, except for that stupid chain.  In my brief delusions of grandeur, I decided to carve the chain from a single piece of Basswood.  After about five minutes I realized that I did not have the time, nor the desire for such an undertaking, so I set out to find a new way to do it.  I still made the chain from a single piece of wood, but I cheated a little, like a so.....
I hand drew the inside and outside dimensions of the chain links onto a single board of Cherry, which was one inch thick (actually slightly less than an inch.  It was 4/4 Cherry exactly one inch thick, but I used my Jack Plane and Try Plane to smooth it out, so it was a smidge thinner), I then used a panel saw to rip the board into more manageable pieces.  I then used a power tool I am comfortable with, my drill press, to clear out most of the internal waste.  
I them cut out the individual links with a coping saw, and then took them to my crappy Lowes miter box, quickly fashioned a way to accurately repeat my cuts, and ripped each link in half, instantly doubling the number of links!  It's Math!  
Now, I took the links and used chisels to clean up the inside holes, and shape the outside of the links a little.  Trying to shape the outsides really sucked, so I ended up pretty much leaving them alone.  I just told myself it would be easier to glue them this way.  After quitting on the shaping, I took the pile of links inside and enlisted the help of my 3 year old, Tave,  to make the chain.  
I simply snapped every other link in half, put two other links into it, glued it back together along its natural break lines, and put a rubber band on it to hold it till the glue dried.  This made it so that I did not remove any material while opening the links, and it also stayed lined up better while gluing than it would had I cut the links.  Tave handed me the rubber bands.  Once the chain was done and dry, I put it on the shield, and had to get all ghetto creative to hold it in place while the glue dried.  I was going to hold each link in place for the glues required half hour of clamp time, but I was pretending to have a life that day.  
 Just as soon as the glue was dry, and I was reasonable sure this thing would hold together, I hung it from the ceiling and started spraying it with 1# shellac (yes, I use canned shellac.  I have found that it actually works really well, and really gets into the cracks like I can never do with a brush or rag).  
 I let each coat of shellac dry for about half an hour, then I would sand the whole thing lightly with a 320 grit sanding block.  I didn't sand the chain, because it seemed hard, and I was tired.  after eight coats of shellac, I declared it finished!  (plus the retirement was the next day, so I was finished regardless of whether or not i was done).  
And, There you have it.  A Chief's anchor with a wood chain made from a single piece of wood.  Like they say, if you're not cheating, you're not trying.  By the way, the perfect joints between the Purpleheart and the Cherry....yeah, I jointed those by hand.  

Some Music Boxes For my Girls.

So, for Christmas last year, I decided to make a music box for each of my girls.  Tave, my youngest, did not get one because my table saw ate it a few days before Christmas.  It was shaped like a star, and as I was making a cut, one of the points of the star pushed the zero clearance insert into the table, and into the blade.  This set off a chain reaction, where the Delta Unisaw's 5hp motor and 10 inch blade spinning at 8000 rpm grabbed the box, took a huge bite off the top, and then threw it at me, hitting me in the stomach.  It then proceeded to chew up the zero clearance insert, and then had the gall to just sit there running like nothing happened.  I am pretty sure I heard it say "Oh, did I do that?  Sorry, I didn't know you wanted to keep that box, I just thought you were trying to feed me.  Just ignore the fact that I just tried to kill you".  It's like the little shop of horrors.  The table saw was downgraded in importance in the shop.  I now have a vintage Disston D28 rip saw, and a new Lie Nielsen cross cut saw.  Take that!


Anyway, the three boxes that survived the holidays turned out pretty good.  I tried something new on each one.  So without further delay, I will show them to you (and you know who you are....the only person reading this blog):


This is Dashle's box.  I made it out of Poplar and Purpleheart.  When I cut the box joints, I intentionally cut them too deep, so that the corners would have a little extra texture.  The top is curved and made from alternating pieces of Purpleheart and Poplar, each shaped by hand and sanded before being glued up.  For the finish, I used a Danish Oil.  I liked the way it highlighted the contrast in the Poplar's grain.  The music movement plays Clair De Lune, by Claude Debussy.


This is Quinn's box.  I made it from Poplar as well, but added Bloodwood splines, and veneered a Zebrawood top on it.  The Poplar is actually from the same tree as Dashle's box, but I used a shellac finish instead of the Danish oil, which luted the grain, and made it shinier.  Being brutally honest, the veneer job sucks.  When you look close, there are tons of gaps and a few spots where I tore out some while sanding it.  I really like the concept, and it was fun to make.  The music movement plays the theme from Swan Lake by Pytor Ilyich Tchaikovsky.   
This is Emry's Box.  It is a bandsaw box made from Rock Maple.  As it turns out, Rock Maple has it's name for a reason.  Cutting this box out gave my bandsaw a workout, and destroyed a blade.  But the result was worth it.  On the top I inlayed two purple horses.  My original plan called for me to inlay Purpleheart horses, but I found that I could not accurately cut the shape out of the veneer that I had, so with only a few days till Christmas, I did what I could.  I cut the shape of the horses out using carving chisels, then I mixed up a batch of wood filler and food coloring, and just filled it in.  The 'E' on the top is carved into a piece of Basswood using carving chisels.  The finish is about 8 coats of 1# shellac.  The music movement plays Canon in 'D' by Johann Pachelbel.  


Well, there you have it.  Three finished projects and one unfinished project that really helped me to steel my resolve to stop using most power tools.  Dumb Table Saw.  

A Jewelry Box For Cass

Cass and I observe our anniversary on August 17th (not the actual date we were married, but the reason we moved it is a different story that perhaps I will share another time).  This year, 2011, we celebrate our 10th long year together.  With my father passing away in June, the expense of getting everyone out to Washington and back for the funeral, and the fact that we also moved to North Carolina in June, which removed our Virginia Beach babysitting network, it was looking like it was going to be a pretty lackluster anniversary.  
Wanting to offer Cass something as a token of how much she means to me, and as a way of capturing the past decade, I decided to make her a jewelry box.  I worked on the design for a long time, and tried to incorporate as much symbolism from our lives together as I tastefully could. 

I started with the species of wood I chose.  The box is made from Quilted Maple and Bloodwood. 

Quilted Maple:  Much like the irregular grain of the Maple, over the past 10 years we have lived in a constant spiral of change and things have happened quite irregularly. Like Cass, Quilted Maple is difficult to work with because it has inconsistent hardness and the irregular grain makes it difficult to cut straight, but when you step back and look at it from a distance, the depth and irregularity of the grain is (in my opinion) the most beautiful wood on earth; the same is true of our life together.  


Bloodwood:  Its red, Cass’ favorite color.  There is more meaning to this as well. If you know the history of our efforts to make a family, you know that more blood (and trips to the ER) is involved in that process than is supposed to be. So, yeah, we've seen a lot of blood in our 10 years together. Good thing deep red is Cass' favorite color, huh?

I bought a jig to assist with the box joints, and used a piece of scrap wood to make a test box. 


 Once I had the jig and my table saw set up and was confident that I could actually build a box, I started to work the maple and bloodwood.  I selected the portions of my quilted maple board that had the most figure and best grain and built the main box as well as a test joint that would serve as a place to experiment on new techniques. 


 Next, I built a base out of Maple and put the bottom in the box.  The base is mitered, so I built a jig to put a spline joint into the corners of the base just to accent it a bit (not shown in this pic, but look for it later)


 Next, I made the lid frame by gluing strips of Maple and Bloodwood together then added the first layer for the top. 


 While trying to decide what to inlay into the top, I thought about what would best symbolize our life over the past decade.  I decided on a compass rose.  For 8 of the past 10 years, I have been in the Coast Guard, so nautical things have become a part of our lives.  Additionally, the compass rose is a symbol of movement and change (we have moved 19 times in the past 10 years) as well as a symbol of constancy and direction.  Cass has been my constant and, regardless of the storm, we have stuck together. There have been a lot of storms. Lots.


After cutting out the pieces of the compass rose by hand and numbering them so I could get them back exactly as they were, I took them out and placed the book-matched panels into the lid. 


 Then all I had to do was trace the compass rose onto the panels, and cut the panels to inlay the compass rose. 


 With the inlay complete, I glued it all together and after it dried, I filled in the spots I didn't cut quite perfect and sanded the top smooth. 


 Next, I started working on the placement of the hinges, hand cutting the mortices where they sit in both the box and the lid. 


 With the basic construction of the main box complete, I built two trays that fit into the box out of Bloodwood with Maple splines in the mitered edges.  Then I sanded everything down and started to finish the box.  I used 6 coats of 1# shellac followed by one coat of lacquer. 


After the finish dried, I did my final assembly and, well, this is what it looks like: 


 I think Cass likes it alright.  If nothing else, it gives her one place to put all her jewelry.  I am truly blessed to be married to such a remarkable woman.  The past decade has been hard, terrible, fantastic, and wonderful.  I look forward to an infinite number of decades with her.